Need some advice?

Showing posts with label lipstain. Show all posts

Tuesday, November 9, 2010

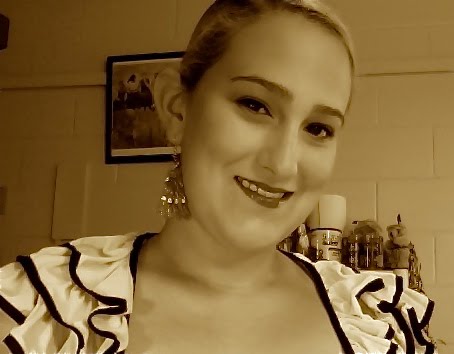
Get the Look: Pretty in Pink (and Purple!)

Berry tones are always popular in the fall and winter when it comes to makeup looks. It warms up the face (which could lose its natural tan) and helps your skin radiate with warmth.
Please excuse my messy hair and gym clothes. I was on my way to Tai-chi class but wanted to make sure I got a picture of my makeup before I worked out. :)


Eyes: For this look, I chose to feature purple eyeshadow, but you could really do a pink or warm maroon as well. After priming the lid, I took Wet n' Wild's eyeshadow in Kitten ($0.99 at Walgreens. What a steal!!) and applied it with a stiff, flat brush all over the lid. I really like this shadow because it has a gold shimmer running through it that, when the light hits it just right, makes it look like you actually applied two eyeshadows: a purple as a base and a gold on top. After packing on the eyeshadow to reduce fall-out, take a fluffy dome brush and blend out the edges into your crease. You can add a highlight on your brow bones and in the inner corner of your eyes with a silver eyeshadow if you want. Apply concealer AFTER your eyeshadow in case of fall-out from the purple shadow that would make any under-eye circles look darker and more apparent.

Lips: I'm loving lipstains at the moment because the require minimal upkeep throughout the day and give your lips a gorgeous color for quite some time. For this look, I used Revlon's Just Bitten in Passion ($8.99 at CVS, but was on sale for buy one, get one 50% off), which gave my lips a delightful, berry-pink color. Make sure you apply a good lipbalm on top of the stain, though, because stains can dry out your lips: a major no-no for the winter. Revlon's lipstains come with a great balm on one end and the stain marker on the other.

Face: I would recommend a peach-tone blush for this look because any blush that's more pink or rosy will make your face look to red in the winter cold. A peach blush will still add a warm pink tone to your face, but won't look too over-done.


And there you have it: a pretty, girly look that is 100% perfect for everyday wear this winter. Enjoy!
Sunday, October 31, 2010

Happy Halloween! My makeup for Rocky Horror night

My university does a free showing of Rocky Horror every year at midnight, the Friday before Halloween. I normally don't dress like a particular character, but just go for outrageously sexy-gaudy makeup. Here's what I wore and here's how to do it! Happy Halloween!!
The look!

Eyes: I started off with an eyeshadow primer to make sure the smokey eye wouldn't shift allover my face throughout the night. Then using this eyeshadow palette, I did a smokey eye..
I first took the taupe color in the upper left corner on a soft dome brush and dusted it all over my lids and about halfway up onto my brow bones. Then, I took the grayish-taupe color on the top right on a stiff, flat brush and packed it into the inner and outer corner of both eyes. Lastly, I took the black shadow in the bottom right corner on the same stiff brush and tapped it onto the center of my lid. This was a pretty dark eye, so to lighten it up a bit, I lined my lower lash line with a white pencil and also took the liner up into the inner corner of my eye...
The white lining I did on the inner corner of my eyes I covered with the silver eyeshadow in the bottom left corner to make my eyes glitter. Next, I lined my eyes with a black gel liner. To get the winged out effect, you need to hold a straight edge against the outer corner of your eye at the angle you want the wing to go (I would recommend tape. It doesn't hurt and it frees up your hand to hold your lid steady). Because I felt the eyes still looked a little too matte for the occasion, I added a thin, metallic blue line in liquid eyeliner between my lashes and the top of the black gel line. It instantly made my eyes pop! Lastly, I curled my lashes and applied a great volumizing mascara (if you want more volume or thicker lashes, apply fake lashes as well)..

Face: Apply concealer AFTER you do your eyes because you will most likely get fallout from the dark shadows that could potentially mess up your concealer if you do that first. Contour your face with a darker bronzer to create a more dramatic look..
I've hit tin pan on this one, but I love it! I'll definitely use the whole thing up.

You can add blush if you'd like. I'd recommend a pink or red so it doesn't look too natural.


Lips: Everyone knows Rocky Horror is famous for the Lips that introduce the movie through the song "Science Fiction Double Feature"! For this look, I did a very dramatic red lip by applying a red lipstain and letting it dry...
Then, apply a true red lipstick. Avoid corals, because they'll look 'off' on top of the stain. Deeper shades like wine should also be avoided because they'll drag down the whole look and seem a bit heavy. So, apply your red lipstick, and then blot away excess. Reapply a light coat if you'd like to make it more shiny. Leave it alone if you want it to be matte.
If you're like me, you probably struggle with making your lips look PERFECT each time you do them. Since red lipstick will definitely stand out if it's not all even, take a light-colored concealer and a small brush and line just outside of your lips, and blend outward. This will highlight your cupids bow, hide any mistakes or discoloration, and make your lips look almost too perfect.


And there you have it: a perfect Rocky Horror look for all of my gorgeous Beauty Brains. Happy Halloween!

Monday, October 11, 2010

Lipstain Love

I think I’m seriously addicted to lipstains. For real.


It all started before Halloween one year. I decided to do a few practice runs on my nun makeup before the big costume party and everything looked great except for my lips. If I used lipgloss, my mouth felt gooey and messy. Lipstick looked more polished, but I felt like I had to reapply it every 5 minutes because it wore off so quickly. It was then that I discovered the lipstain: a cool, marker-like makeup product that gave you a gorgeous pout for up to 12 hours.


The first lipstain I loved was mark.’s Kissink Lip Tintmarker in Red Siren ($7.00). The lipstain’s packaging literally looked like a mini magic marker, which freaked me out at first. Did I buy a cosmetic product or did the company accidentally send me some of their office supplies?


Nevertheless, I tried it out and was pleasantly surprised with the end result. I had a gorgeous, berry-red lip that lasted about eight hours before it began to fade. I could even layer lipstick on top of it and it lasted longer than five minutes!


To be honest, though, mark.’s lipstain looks really strange when it’s first applied. In fact, it had a really ugly brown color at first that freaked me out (once again). Oh no! Did I just dye my lips a weird coffee color?! But the color faded into a beautiful red within one minute and my wave of fear washed away.


Recently, I discovered Maybelline’s Color Sensational Lipstain in In The Buff (on sale for $4.19 at Ulta right now). Definitely a new favorite product! Like mark.’s stain, Maybelline’s product also comes in a magic marker packaging, except it’s slightly larger (more product? Yay!). I was happily surprised to find that it had a delicious berry scent that I had never noticed in another makeup product before. While the stain only lasted half as long as mark.’s lipstain, it still looked gorgeous on and wasn’t awkward to reapply in public (mark.’s could look a little strange because of the dark brown color).


Overall, I would strongly recommend a lipstain to anyone that is sick of lipglosses and lipsticks. Be sure to exfoliate lips before applying it, though, because a stain can look very drying.


Have you used a stain before? What were your experiences with it? If you haven’t, would you ever try one?